Today’s project is a super easy mini gift bag for Easter!

Here’s another view:

And another:

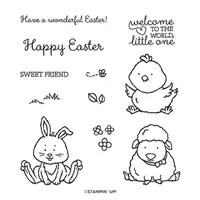
And here’s a look at how adorable this bunny is from the Welcome Easter stamp set:

How sweet is he?!? Inside this mini gift bag is a Lindt Gold Bunny! They also come in Mini Chicks and Little Lamb – absolutely PERFECT to pair with the Welcome Easter stamp set!! I found these chocolates at Target.
This project is so quick & easy – perfect for making multiples! All you need is a 4″ x 6″ piece of Designer Series Paper! So that means you can get 6 of these out of one sheet of 12″ x 12″ DSP.
To make this project go together even faster, I used my Brother ScanNCut CM350 to cut an entire sheet of bunnies! This girl DOES NOT enjoy fussy-cutting, so the ScanNCut is my best friend for cutting multiple stamped images that don’t have coordinating dies!
Without further ado, here’s my video tutorial! I also show you quickly how I use the ScanNCut!
Here’s the template for reference (not to scale):

Thank you so much for stopping by today! I hope you have a wonderful & blessed weekend!
PROJECT MEASUREMENTS:
- Finished Size – 3″H x 1-3/4″W x 1″D
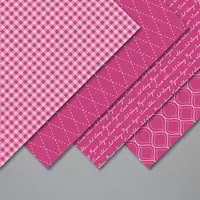
- Brights 6″ x 6″ Designer Series Paper – 4″ x 6″
- Score along the 6″ side at 1-3/4″, 2-3/4″, 4-1/2″, and 5-1/2″
- Rotate clockwise and score along the 4″ side at 1″
PROJECT SUPPLY LIST:


Have a question or comment about today’s post? I’d love to hear from you!
If you enjoyed this post, here are more ways to stay inspired:
- Join my email list and get my free Shadow Box Worksheet
- Shop with me and earn Stampin’ Rewards on orders of $20+
- Explore my project gallery for more creative ideas
Thank You for this adorable gift bag tutorial/template.. I have utilized the template and made a darling little Easter Treat Bag .. (https://ajcreativeenergy.blogspot.com/2020/04/kawaii-easter-treat-bag.html ) ..
In the March/April Horizons magazine (page 34) the article references your website as a source for directions to make a “small essentials box.” I have come to your website, but I do not see where to find these directions. I am looking for a gift/favor for our Presbyterian Women’s group to make for our local Meals-On-Wheels clients and thought this project might work for us. I do remember having my students (I am a retired–for 18 years now–math teacher) make little boxes folded out of recycled greeting cards. I am hard-pressed now to find those directions. Any help you can offer me will be greatly appreciated. Thank you in advance!
Hi Virginia! Here’s the link to the Essentials Box tutorial: https://thepaperpixie.com/2019/03/essentials-kit-in-a-box.html
Hi Julie, I recently found your blog and absolutely love it. I made several of the Easter mini gift bags for my personal use, because they’re addictive, but I’ll have my stamp club members make them, too. Will obviously give you credit.
I do have a question about your Brother scanNcut machine. Your video shows you have a CM350. In my online search I didn’t find just a CM350, but found a CM350e and a scanNcut 2. Can you tell me how these modeIs differ from yours?
Thank you for sharing your creativity; I’m now a fan.
A fellow demonstrator,
Jeannette
Hi Jeannette! Thank you so much! The CM350 has been discontinued as I understand it, but the CM350E is the same machine, it just comes with a wireless activation card I think. Also, the ScanNCut2 is the same thing – it’s what the CM350/CM350E is called. So the screen options should all look just the same as what I shared on my video. I hope that helps you!
I love this project!! And thanks so much for the scanning tutorial! I was doing it the hard way with the scanning mat, then putting on the cutting mat….so much extra effort! We will be making these (along with your cuter than cute little box) at my next Stamp Camp. As always, you will get full credit for coming up with these adorable treat holders!
Thanks again!
Thank you so much, Becky! Yes, there is a MUCH easier way to use it!!
Oh, Julie, THANK YOU SO MUCH for sharing how you cut out your images with the Scan N Cut!! I purchased this machine many months ago, and have been terrified to use it! After seeing your video, I can’t wait to get it out of the box and put it to use! No more fussy cutting by hand? YAY!! I love your projects and videos…please do more using the Scan N Cut!
Thank you so much, June! I plan to!
Hi Julie! Love your videos! I am interested in the Scan&Cut but have only a basic knowledge with the computer/ tech. Is the Scan & Cut relatively straight forward to learn?
Hi Barbara! Yes, it’s easy to learn! Especially for scanning and cutting stamped images.
Hello, hello Julie: Oh my gosh!! as always, your little projects are adorable and this cute Easter bag is no exception. I’m going to look for those chocolate bunnies, chicks and lambs at my local Target store later today.
Now……I’m blown away by your scan and cut machine, I’ve always wanted one but the only one that I’ve heard of is the Cameo and that one is expensive.
I went and Google the name of yours and I got several pictures of these machines so I clicked on the one that looks like yours and to my delight, the price is a minuscule fraction of what the Silhouette Cameo costs.
Thank you for showing us how you use this machine, you have a fantastic way to explain what you’re doing on your videos and thank you also for sharing all of this information with us.
I’m so very grateful.
Have a lovely Sunday.
XO
Maria Rodriguez.
Thank you so much, Maria! You are such a sweetheart with your thoughtful comments! They always make my day! I haven’t looked at the Cameo, because I love my SNC so much, but good to know that the SNC is only a fraction of the price!
Love your projects. This one is really sweet.
Thank you so much, Ann!
I have got to tell you just how much I enjoy your projects!!! I especially like the fact that you take the time to draw a template and share it with us. I am a visual learner and this is so helpful to me.
Again, thank you and I will continue to enjoy your projects!
Thank you so much, Janet! I’m thrilled you enjoy my templates – they help me too!
Julie, thanks for sharing your ideas with us. I’ve just tried this little bag and it worked so well! I have tried a number of your projects and love them all as your instructions are easy to follow. Greetings from Australia.
Thank you so much, Ruth! I’m honored to inspire you!
Thank you for the Scan n cut tutorial -looks like a crafters dream!!
Happy to share, Susan! It sure is!
This is so adorable and easy to make mulitiples of for grandchildren
Thank you so much, Donna! Lucky grandchildren!
Love it! I love everything you make!
Thank you so much, Tammy!
These are so cute. I am going to make some in floral for table favors for a tea table.
Thank you, Donna! Ooh! Those would be perfect for tea table favors!
Adorable!!!! This little box really showcases that cute bunny!
Thanks for all your amazing ideas & videos!!!
Thank you so much, Karen!
So so cute will be making some of these
Thanks so much for sharing your creativity
Thank you so much, Diana! Happy to share!
Hello Julie
This is just a perfect gift bag. It would work for all those special little chocolate treats that come out at Christmas, Halloween as well as Easter.
Also thanks for the info on the Scan n cut. I am new at paper crafting and had no idea something like that existed.
Hope there are some stores in Canada where I can get a better look at it.
I have subscribed to your utube and love getting the Emails. I also watch all your videos. You make really beautiful creative projects.
I am a fan
Bonnie
Thank you so much, Bonnie! You made my day! I’m honored to inspire you!
I just love this little box. I get so much inspiration from your projects! Have a great day.
Thank you so much, Sue!
That is soooo cute! Thanks for so willingly sharing your creations, videos and measurements!
Thank you so much, Carole!