I have an embellishment storage idea for you today! My adhesive-backed embellishment storage has never really sparked joy for me (and I’ve tried SO many different things)… until now!
This post may contain affiliate links and I may earn a small commission if you click on the links and make a purchase at no additional cost to you. As an Amazon Associate, I earn from qualifying purchases. You can read my full disclosure here.
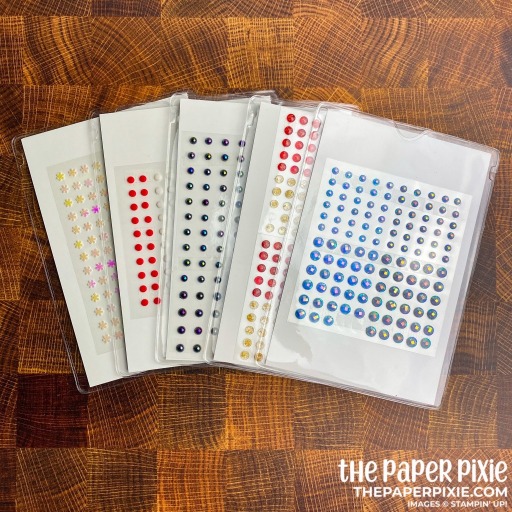
One of the challenges is that the packaging for our adhesive-backed embellishments comes in all different sizes, which can be an organizational nightmare! So, I needed to normalize the size for storage.
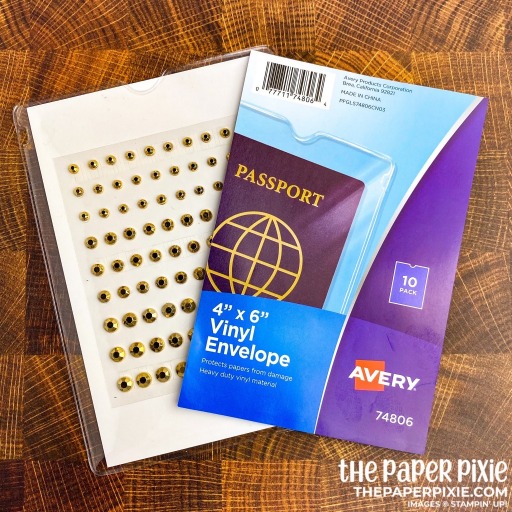
I do like the heavier weight backing the adhesive-backed embellishments come packaged with. It’s very similar to the backing that our 12″ x 12″ Designer Series Paper comes with. After looking at all of our adhesive-backed embellishments, I determined that they would all fit a 4″ x 6″ backing, and you can get six 4″ x 6″ pieces from the 12″ x 12″ DSP backing!
So, off to the internet I went to find a 4″ x 6″ clear pocket and I found these Avery 4″ x 6″ Vinyl Envelopes! 10 come in a package for around $6. Not only are they the perfect size for your Passport, but also your adhesive-backed embellishments!
Now my adhesive-backed embellishments are all a uniform size and I can store them in my divided container by category for easy browsing!
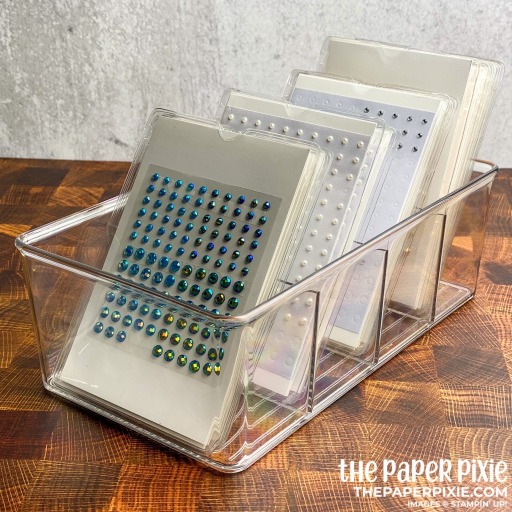
Here’s another view of the 4-section organizer bin I use:

I’ve created a video for you so you can see this storage in action, including how I adhered the embellishments to the 4″ x 6″ backing!
Here are the items I use for my embellishment storage:


I hope this organization tip will help you corral your adhesive-backed embellishments! Now they spark joy for me!
Thank you so much for stopping by today! I hope you have a wonderful & blessed day!
PROJECT MEASUREMENTS:
- Designer Series Paper backing – 4″ x 6″ (you can get 6 pieces from one 12″ x 12″ piece!)
Have a question or comment about today’s post? I’d love to hear from you!
If you enjoyed this post, here are more ways to stay inspired:
- Join my email list and get my free Shadow Box Worksheet
- Shop with me and earn Stampin’ Rewards on orders of $20+
- Explore my project gallery for more creative ideas
This is great. I was also looking for something to put my adhesive embellishments in so I’m glad I found your video and I did order the Avery pockets and bin to put them in so thank you for that.
This embellishment storage video is perfect! Just what I needed. Will be ordering through your links. Thanks very much, Julie.
It’s so nice to have all the embellishments in uniform storage! Happy organizing, Laura!
Paper pixie how do you store your SU cases for your stamps? I am trying to figure it out at the moment, we’ll actually the last year. I can’t decide if vertical or horizontal is better! Curious to know what you do! Thank you!
I store my stamp sets in a Stamp-n-Storage Mega Stamp Case Shelf (affiliate link): https://www.stampnstorage.com/mega-stamp-case-shelf/#a_aid=thepaperpixie.
This is a wonderful idea for the SU embellishments! Thank you very much’
Thank you, Julie! It’s one of my absolute favorite storage solutions!
Julie- this is good information thank you for sharing with everyone.
Finally I have met a person who is truly organized and loves things to be uniform!! You are brilliant. Thanks for this too and if you have any for embossing folders (odd sizes), 6×6 paper, stickers, and finally (I hate to admit it) non Stampinup stamps both polymer and rubber. Thanks again!!! You’re an inspiration ❤️
This is awesome! Thank you so much!
Hi, just found this on pinterest and love the idea! I have trouble with storing these and I have them in a notebook and I dont look at them, this way I can see them. Thanks for the wonderful idea!
This is genius! Thanks for sharing!
Thank you so much, Jen!
Hi Julie!
Thank you for this video. Very simple, but visual aid is always a plus I can’t wait to get my plastic holders from Amazon and do this.
Marlene
Absolutely love this embellishment organization video!!! Ordered the passport envelops, cut the inserts and today’s project was putting them all together and now my embellishments are happily filed and ready to go!
Another great tip!
Thanks Julie
Love, love, love this tip for organizing!! Going to start cutting inserts right away! Thanks!!
I need SO much help with organizing; I LOVE this and hope to get it put together this next week! Thank you for all of your awesome ideas!
How do you label your embellishments?
Hi Veneta! I just use my Brother P-Touch label maker and label the insert, so that I can reuse the vinyl pockets for different embellishments. You could also just cut the label from the embellishment package and adhere it to the insert as an alternative!
I am new to your blog and I have also been looking for a Stampin’ Up source – I am so glad to have found you, The Paper Pixie!
I am writing today, because I LOVE your solution for storing the blingy embellishments. I love that you are upcycling the backer board for the paper packaging and the 4×6 pockets are a long lasting option that can be reused over and over as you use up and replenish your embellishments. Thank you for sharing.
Thank you so much, Melody! I’m honored to inspire you and so happy this organizational idea is helpful for you! It’s one of my favorites! ♥
Hi Julie, thank your for your ideas of using the passport holders. I will be purchasing them. Your ideas and videos are always so helpful!
Waou !
But do you remenber the color ?
Stéphy from France
This is so helpful. Thanks for the great tip.
Love both the treat boxes and the storage for adhesive backed embellishments. Thank you.
Thank you for the ideas for storage of the embellishments, Julie! I have struggled for years on how to best store them. I am unsure of the clear box. Will you please give me some more details. Thank you!
Just watched the Facebook live and love the little treat boxes!
I love this idea!
Thank you!
I love watching your videos! I am new to paper crafting and I have subscribed to your channel because your illustrations helps me understand what your doing. I really love what you do and I never thought that crafting could be so much fun! I live in cumming Georgia just a little north of Atlanta and we may be neighbors who knows! I would love to receive a catalog. If you can provide one that would be great! I make my own soaps and I’m trying to be creative with making boxes etc… thank you! Jayne
Great idea. . I am always losing mine in different places. I am going to do it. Thanks for sharing.
Great tip, thank you so much.
Thank You! You are so kind to share these great ideas.
Thank you for sharing this great storage tip with me! I’ve ordered the clear envelopes and will be converting my embellishments as soon as they arrive. I don’t have room for the clear box, but the one I’m using will accommodate the 4″ x 6″ envelopes nicely. And the system will certainly make finding and using the embellishments much easier!!
Julie, I simply love this idea. Will be buying some of the pockets for all my gems or ?. I’ll start to make the inserts today so I’m ready when they come in. Be safe & TYFS
Oh my gosh! This has been my recent aggravation- embellishment storage! Thank you for the perfect solution!! You are amazing!!❤️❤️
Julie, this looks like a great idea! I ordered the bin and pack of envelopes to try this. It is a constant struggle to organize this type of supply. I’ll write the name on the top of the card as I have a hard time remembering what they are called! Have a wonderful day 🙂
Perfect solution to an irritating problem! I love it, Julie. Thanks so much for sharing the idea and the links!
OH YES, YES, YES!!!
This is one of the BESTEST tricks I have seen. Thanks so much for sharing and the video. I actually already ordered mine. I can’t wait to get started on this tip.
Have a blessed day.
Thanks for sharing this tip. I have been a fan of these clear bins for a while now. With YOU and The Home Edit ladies, I am continually shopping for new product.
I love the mdesign bins. I have several beacaus the fit so perfectly on a bookcase. Cool idea with Avery passport pockets. I’m not liking my current storage. Reusing the pockets our SU dies come in sounded like a good idea but they are bulky. kudos to you for organization. thanks
Thanks for sharing I ordered it all to bring sanity back to my embellishments. I have a stamping up demonstrator already but I am so blessed with your site. Thanks for sharing all your great ideas
Always great ideas! ☺️