Today’s project is a triangular treat box featuring the In Bloom Bundle paired with the Paper Blooms Designer Series Paper (FREE with a $50 purchase during Sale-A-Bration)!

This adorable treat box comes from Karen McDonald at Corrie Papercrafts! I’ve shared this project before and I love it so much I just had to create another one! This treat box perfectly holds a pair of Hershey’s Nuggets!

Here’s how the box opens:

And here’s the box paired with the matching card:

I absolutely LOVE the In Bloom Bundle paired with the coordinating Paper Blooms Designer Series Paper! Without further ado, here’s my video tutorial:

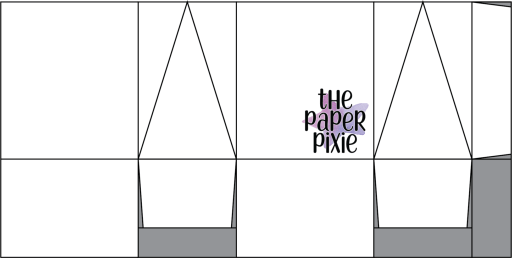
And here’s the template for reference (not to scale):
Thank you so much for stopping by today! I hope you have a wonderful & blessed weekend!
PROJECT MEASUREMENTS:
- Finished Dimensions – 2″H x 1-3/4″W x 1-1/4″D
- Seaside Spray cardstock – 3-1/4″ x 6-1/2″
- Score along the 6-1/2″ side at 1-3/4″, 3″, 4-3/4″, and 6″
- Add tick marks at 2-3/8″ and 5-3/8″
- Rotate clockwise and score along the 3-1/4″ side at 1-1/4″
- Paper Blooms Designer Series Paper – 1-3/4″ x 6″
- Seaside Spray layer – 1″ x 1-3/4″
PROJECT SUPPLY LIST:


Have a question or comment about today’s post? I’d love to hear from you!

If you enjoyed this post, please be sure to…
- Use my current host code on orders under $150! Customers who place an order of $25 or more earn Pixie Perks!
- Shop the Clearance Rack with discounts up to 60%!
- Read my Top 10 Reasons why purchasing the $99 Starter Kit is the best decision ever!
- Subscribe to my YouTube Channel for paper crafting video tutorials!
- Visit my gallery for more paper crafting inspiration!

Hello Julie,
Received my purchase gifts….Thank you
Very cute little box & card! I love this DSP. I have 2-pkgs.
Thanks for sharing your great ideas!