Today’s box is so cool! It’s a Triangular Pyramid Gift Box (or tetrahedron) and I was so excited to figure out the measurements for you! This would look so beautiful on the holiday dinner table or as a wedding favor! If you work your magic with ribbon, it could be an ornament too! I hope you’ll give this beauty a try!
This post may contain affiliate links and I may earn a small commission if you click on the links and make a purchase at no additional cost to you. As an Amazon Associate, I earn from qualifying purchases. You can read my full disclosure here.

I’ve had this Triangular Pyramid Gift Box on my radar for a long time! I was inspired by a project I found on the German website Steckenpferdchen and hadn’t figured out a way to “Pixiefy” the bottom of the box yet, so I came up with this version back in 2020. Fast forward to 2024 and I figured out measurements for you so you can recreate this beautiful box yourself!

This one fits a Ferrero Rocher perfectly and would look so beautiful sitting on a dinner table for a special holiday dinner! The ribbon is totally optional (I added it “on the fly” during my livestream).

If you used a longer piece of ribbon, you could feed it through both the bottom and the top to create an adorable ornament for the tree!
Because this triangular pyramid (or tetrahedron) box is so unique, I wanted to give you a closer look at the lid and base:


It’s really an amazing box! I hope you will give it a try!
Here are the templates for reference (not to scale):

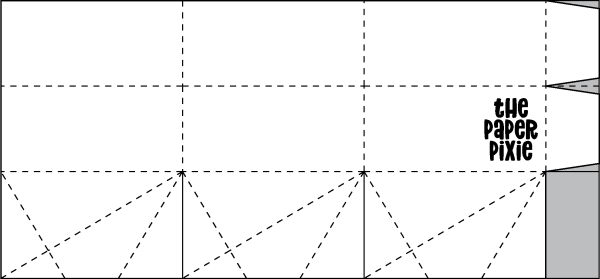
PROJECT MEASUREMENTS:
- Finished Dimensions: 2″H x 2-1/4″W x 2″D
- Box Lid – 3-3/4″ x 7-3/8″ (landscape)
- Score along the 7-3/8″ side at 2-1/4″, 4-1/2″, and 6-3/4″
- Rotate clockwise and score along the 3-3/4″ side at 3/4″ and 1-1/2″
- Box Base – 3-1/4″ x 7″ (landscape)
- Score along the 7″ side at 2-1/8″, 4-1/4″, and 6-3/8″
- Rotate counter-clockwise and score along the 3-1/4″ side at 1″ and 2″
- Rotate counter-clockwise again and add tick marks along the 7″ side at 1-3/8″, 2″, 3-1/2″, 4-1/8″, 5-5/8″, and 6-1/4″
Want to see this project demonstrated in action? Check out the livestream replay!
Thank you so much for stopping by today! I hope you have a wonderful & blessed day!
PROJECT SUPPLIES:
Have a question or comment about today’s post? I’d love to hear from you!
If you enjoyed this post, here are more ways to stay inspired:
- Join my email list and get my free Shadow Box Worksheet
- Shop with me and earn Stampin’ Rewards on orders of $20+
- Explore my project gallery for more creative ideas
This little box looks gorgeous & you explain everything so well, even I will have a go at making it.
My first ever experience with you Julie. Your instructions are meticulously accurate where by finishing the item was pleasantly attainable.
Cutest box ever! I started, however;, my brain said “not today” I got confused on the folding aspects. When I try it again I’ll post
So much fun to make the box, thank you, I am a real boxmaker.
Wow ,thank you so much for this amazing tutorial and project sheet. You must have spent ages preparing , for this,
it is much appreciated as it has given me the confidence to try and make one.
This box is super cute!! It’s on my list to make!
I cannot wait to make this! <3 Thanks so much! Have a great weekend!
This would make a perfect elegant little treat box for a wedding or shower favor!
Just a little above the average! Thank you, Julie!
Love this box. Can’t wait to try it! Thank you!
OMG……wish I had an 1/8th of your mind!! Love this! Thank you!!!❤️
Julie, I enjoy your video presentations and the tutorials you send via emails.
Thank you!