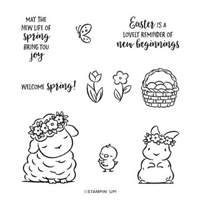
Today’s project is a storybook box featuring the Springtime Joy stamp set paired with Hydrangea Hill Designer Series Paper and sized to fit a Reese’s Peanut Butter Egg!

How cute are these storybooks??!? I made a similar box years ago to hold 2 Hershey’s Nuggets, which you can check out HERE. This is such a fun box to gift to someone! Here’s how the Reese’s Peanut Butter Egg fits inside:

And here’s the hidden Springtime Joy sentiment inside the box:

I love a little hidden surprise sure to bring a smile! Now, when I designed this box, I originally glued the closure strip to the outside of the box, like so:

This was by design and how I came up with the measurements. But, during my livestream, one of my viewers asked if the closure could be glued under the box, and it sure can! I shared this version in my shortened video tutorial below:

So, pick your preference! You have options 😉. Without further ado, here’s my video tutorial:

And here’s the template for the inside box for reference (not to scale):

Thank you so much for stopping by today! I hope you have a wonderful & blessed weekend! ❤️
PROJECT MEASUREMENTS:
- Finished Interior Dimensions: 3″H x 2″W x 7/8″D
- Seaside Spray cardstock (box): 5-1/2″ x 6-1/2″
- Score on all sides at 7/8″ and 1-3/4″
- Seaside Spray cardstock (cover): 3-1/4″ x 9-7/16″+
- Score at 2-1/8″ and 4-1/4″ from both sides
- Seaside Spray cardstock (closure): 1″ x 4-1/4″
- Score at 2-1/8″ and 3-1/8″
- Hydrangea Hill Designer Series Paper
- 2″ x 3-1/8″ (2 pcs – portrait) – front & back cover
- 13/16″ x 3-1/8″ (1 pc – portrait) – spine
- 1-7/8″ x 2-7/8″ (1 pc – portrait) – inside box base layer
PROJECT SUPPLY LIST:


Have a question or comment about today’s post? I’d love to hear from you!
If you enjoyed this post, here are more ways to stay inspired:
- Join my email list and get my free Shadow Box Worksheet
- Shop with me and earn Stampin’ Rewards on orders of $20+
- Explore my project gallery for more creative ideas
I must be doing something wrong – I could not get the cover to fit the box based on:
Seaside Spray cardstock (cover): 3-1/4″ x 9-7/16″+
Score at 2-1/8″ and 4-1/4″ from both sides
The gap was too wide and so I had to change it to 2 1/8th x 4 1/2″ from each side to make the box fit the cover. Cant work out what I have done wrong checked it twice.
I too would like to know if you have a larger sized one (as per Rosemarys comment). Please let me know if anyone else had difficulty with the cover fitting the box or if it must just be a mistake on my part. (probably)
Hi Heather! Make sure you’re cutting to 9-7/16” instead of 9-7/8”. 9-7/16” is just before 9-1/2”. I don’t currently have a tutorial created for a larger-sized one, but I’ll add it to my list of possible future projects!
Beautiful box love it
These will be great for when my book club gets back together in person
Gosh….I love your projects but, you have really outdone yourself on this one……. Really got to try this one quick..Many thanks
Hello Julie D
I would like to know if you have a pattern for the storybook in a larger size. I would like to make this box for a my kindergarten class. They will make a gift for their mothers, and this box will be great for them to put the gift in. Thank you very much, please let me know.
By the way I love all the things you make.
Thank you
Thank you so much gory our wonderful tutorial! Your directions were so clean and I am so impressed with how professional my box looks! Your attention to entail is so appreciated!
This is so cute. I love all your little treat boxes you make and your videos are so well done. Thanks for the inspiration.
0Julie you out did yourself again with this little book. LOVE it. you explain it so it is easy to follow. Thanks again Dee
Thank you so much, Dee! ♥
Julie: This was the cutest box. I love the paper & greeting on the inside. You are so clever & a great inspiration to me! I really enjoy all of your videos & projects. Keep up the great work!
Sandie Ehlers
Thank you so much, Sandie! Honored to inspire you! ♥
Love love this box. I am a box person also…Have to make some of these…have to find 13/16….lol seriously I do have a hard time with those measurements…but love that you guided us as to where it is. Great details. This box appears very sturdy…like you said….many uses for this little darling.
Thank you so much, Vickie! I know the 16ths can be tricky, but hopefully my tips help! ♥